

Automation tools are widely used to simplify repetitive tasks, especially in click-based games, productivity workflows, and testing environments. One of the most powerful features available in modern automation tools is the Multi-Point Auto Clicker.
Instead of repeatedly clicking a single location, this advanced setup allows users to automate multiple click positions on the screen simultaneously. Understanding how to configure a Multi-Point Auto Clicker can greatly improve efficiency and reduce manual effort.
In this guide, we will explore what it is, why it is useful, and how to configure it properly for both gaming and productivity tasks.
Table of Contents
What Is a Multi-Point Auto Clicker?
A Multi-Point Auto Clicker is an automation tool that performs automatic clicks at multiple positions on a screen. Unlike a basic auto clicker that clicks only one spot, this advanced system allows users to define several click points that are triggered sequentially or simultaneously.
This feature is especially helpful when a task requires interacting with several buttons, menus, or interface elements. Instead of manually switching between locations, the Auto Clicker handles everything automatically.
Many modern automation tools provide a simple interface that lets users add click points, set click intervals, and control the order of clicks.
Why Use a Multi-Point Auto Clicker?
There are many reasons users choose a Multi-Point Auto Clicker rather than a standard single-click automation tool.
1. Efficiency in Repetitive Tasks
Many digital processes involve repeatedly clicking multiple areas of the screen. With a Multi-Point Auto Clicker, users can automate the entire sequence, eliminating the need to perform each step manually.
2. Improved Productivity
In productivity workflows, tasks such as confirming dialogs, navigating menus, or triggering actions can be automated. This allows users to focus on more important work while the automation handles routine tasks.
3. Better Gaming Experience
Click-based and incremental games often require players to interact with several elements on the screen. A Multi-Point Auto Clicker can automate actions like collecting rewards, activating upgrades, or triggering abilities.
4. Reduced Physical Strain
Repeated clicking can cause discomfort during long sessions. Using a Multi Point Auto Clicker reduces repetitive hand movements and makes long sessions more comfortable.
Basic Requirements Before Setup
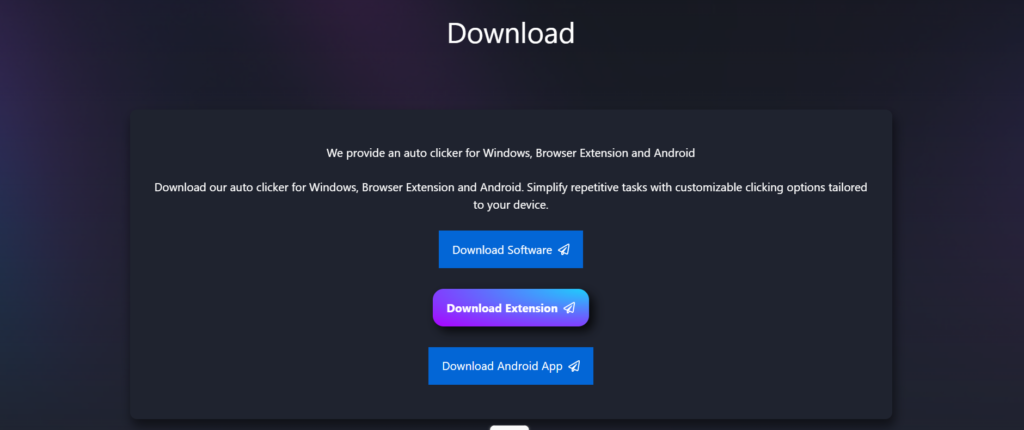
Before configuring a Multi-Point Auto Clicker, there are a few basic requirements to consider. First, ensure you are using a reliable automation tool that supports multiple click points. Many modern auto-clicker programs include this feature, but some simpler tools support only single-location clicking.
Second, make sure the device or operating system supports automation software. Desktop platforms like Windows typically offer the most flexibility, while mobile platforms may require special permissions.
Finally, understand the application or game’s interface you want to automate. Knowing where clicks need to occur will make it easier to configure your Multi-Point Auto Clicker correctly.
Step-by-Step Guide to Configure a Multi-Point Auto Clicker
Setting up a Multi Point Auto Clicker is usually straightforward once you understand the basic process.
Step 1: Install the Automation Tool
Begin by installing an auto clicker program that supports multi-point functionality. After installation, open the program and explore the interface to locate the configuration options. Most tools include sections for click intervals, click locations, and automation controls.
Step 2: Enable Multi-Point Mode
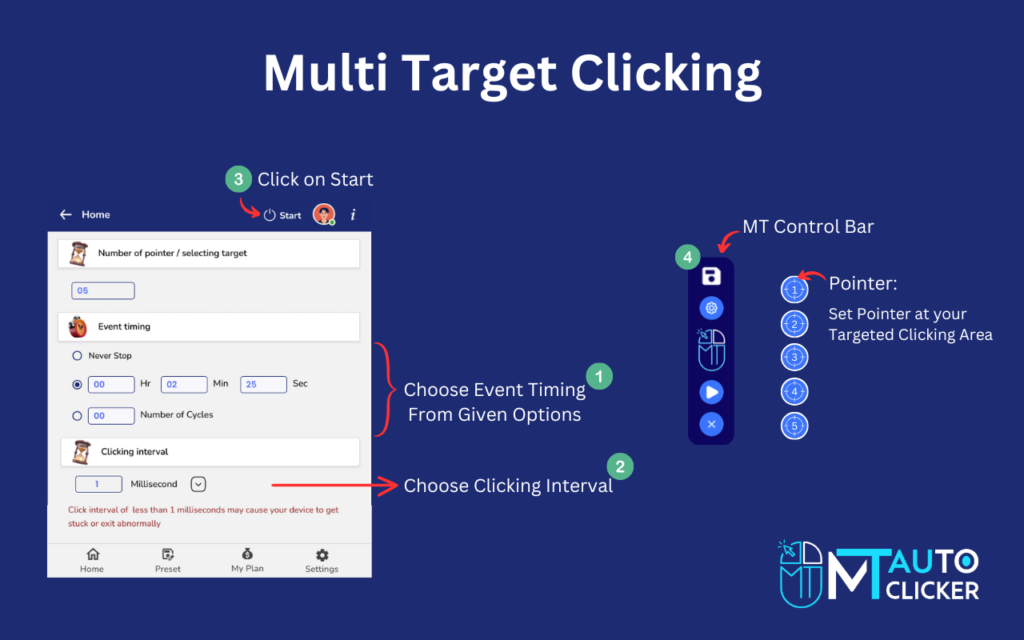
Next, enable multi-point clicking in the application. This option allows you to add multiple coordinates where the Multi-Point Auto Clicker will perform clicks. The interface typically displays a list where new click points can be added.
Step 3: Add Click Locations
Move your cursor to the first location where a click should occur and record the coordinate in the program. Repeat the process for every additional click location. Each coordinate represents a different point where the Multi-Point Auto Clicker will perform automated clicks.
Step 4: Configure Click Intervals
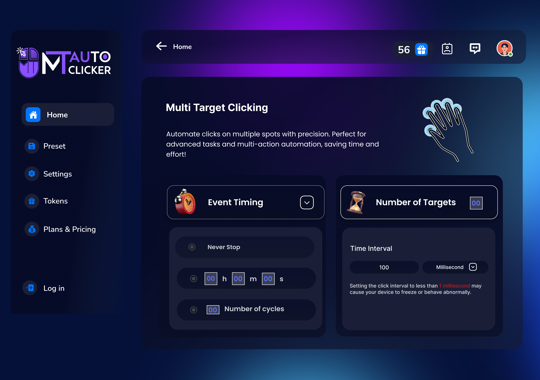
After setting the locations, configure the click timing. The interval determines how quickly the automation cycles through the click points. Balanced timing is important for a stable Auto Clicker setup. Extremely fast intervals may cause system instability or reduce accuracy.
Step 5: Set the Click Order
Many tools allow users to control whether click points are triggered sequentially or simultaneously. Sequential clicking means the Multi-Point Auto Clicker moves through each location in order, while simultaneous clicking triggers all locations at once. Choose the mode that best fits your specific task.
Step 6: Assign Hotkeys
Hotkeys allow users to start or stop automation instantly. Assign a convenient keyboard shortcut to quickly activate or pause the Multi-Point Auto Clicker. This provides greater control during long sessions.
Step 7: Test the Configuration
Before running the automation for extended periods, test the configuration briefly. Observe how the Auto Clicker interacts with the interface and ensure that all click locations are accurate. If necessary, adjust the coordinates or timing until everything works smoothly.
Common Use Cases
A Multi-Point Auto Clicker can be used in a wide variety of scenarios.
- Incremental and Click-Based Games: Many players use automation to collect resources, trigger upgrades, or activate abilities automatically.
- Software Testing: Developers use a Multi-Point Auto Clicker to simulate user interactions and test application interfaces.
- Data Processing Tasks: Certain online workflows require repeated confirmations or button presses, which can be automated using multiple click points.
Tips for Optimizing Multi-Point Auto Clicker Performance
To get the best results from your Multi-Point Auto Clicker, follow a few simple optimization tips.
- First, avoid setting extremely fast click intervals unless the system can handle them. Moderate speeds usually produce more reliable results.
- Second, keep the click locations organized. Labeling or arranging them logically can help maintain clarity when managing multiple points.
- Third, periodically review the configuration. If the application interface changes, the Multi-Point Auto Clicker settings may need to be adjusted.
Safety and Responsible Use
Automation tools should always be used responsibly. While a Multi-Point Auto Clicker can greatly improve efficiency, it is important to follow platform guidelines and respect application rules.
In gaming environments, for example, some platforms may restrict the use of automation tools. Understanding these rules helps avoid unintended consequences. Using trusted software sources and maintaining updated security practices also ensures safe automation.
Conclusion
A Multi-Point Auto Clicker is a powerful automation tool that allows users to automatically interact with multiple areas of the screen. By configuring several click points, users can automate complex sequences that would otherwise require constant manual effort.
From gaming to productivity workflows, the benefits of using a Multi-Point Auto Clicker include improved efficiency, reduced physical strain, and more consistent task execution. With proper setup and responsible usage, this automation feature can significantly simplify repetitive digital tasks.
Learning how to configure a Multi-Point Auto Clicker correctly ensures that users get the maximum benefit from their automation tools while maintaining stability and control.